Adım Adım PowerShell Komutları İle Citrix Virtual Apps and Desktops Kurulumu

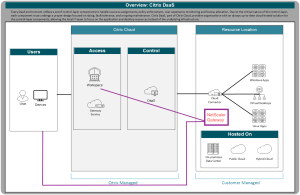
Adım adım PowerShell komutları ile Citrix Virtual Apps and Desktops kurulumu nasıl yapılır biraz buna bakalım. Normalde arayüzden kurmak zor değil, resmi döküman sayfasında PoC Guide ile başlayan bazı içerikler var onlara bakarsanız üç aşağı beş yukarı kolaylıkla anlarsınız. Şimdi gelelim bu işi PowerShell ile yapma kısmına; bu makaleyi özellikle CVAD kurulumunu bir script haline getirip kendi altyapısında otomatikleştirmek için veya müşteriye hızlı bir şekilde sıfırdan bi ortam vermek isteyen arkadaşlar dikkatle okuyacaktır.
Öncelikle nelere ihtiyacımız var biraz bundan bahsedeyim;
- Windows Server 2016/2019/2022 olmak şartıyla 2 VM, Windows 10/11 olmak üzere 1 VM (1 Desktop Delivery Controller ve rolleri, 1 Storefront, 1 Windows 10 Master Image için VM)
- Bu VM’lerin AD ortamında olması gerekmektedir
- CVAD’a ait .ISO dosyası
- Citrix PowerShell .SDK’in yüklenmesi
- Tüm bunları yaparken yetkili bir kullanıcı veya AD üzerinde oluşturulmuş yetkili bir Service Account
Temel olarak yukarıdakilere sahipseniz ufaktan başlayalım.
- Bileşenlerin kurulumu ile başlayalım. İlk etapta indirdiğiniz .ISO dosyasını mount edin. Sonrasında Citrix Desktop Delivery Controller, Citrix Studio ve Citrix Director kurulumları yapacağız. Bunlar için çalıştıracağımız komut;
# ISO dosyasını mount edin
$driveLetter = “D:”
cd $driveLetter# Delivery Controller Kurulumu
Start-Process -FilePath “$driveLetter\Support\Tools\CitrixPoshInstaller.exe” -ArgumentList “/components Controller /quiet” -Wait# Citrix Studio ve Citrix Director Kurulumu
Start-Process -FilePath “$driveLetter\Support\Tools\CitrixPoshInstaller.exe” -ArgumentList “/components Studio Director /quiet” -Wait
- .NET Framework Kurulumu
# .NET Framework 4.8 Kurulumu
Install-WindowsFeature NET-Framework-Core
- Citrix PowerShell modüllerinin yüklenmesi
Add-PSSnapin Citrix.*
- Citrix 3 bileşen (Site, Monitoring ve Logging) için DB kullanır, SQL Express üzerinde geldiği için genel olarak yeterlidir ama ben Mirroring ya da Clustering yapacağım derseniz ücretsiz olarak MSSQL Developer Edition kullanabilirsiniz (production ortamlarında kullanmamanız tavsiyemdir)
# SQL Sunucusuna bağlantı
$SqlServer = “SQLSERVER_ADI”
$DatabaseName = “CitrixSiteDB”# Site Database oluşturma
New-CtxDatabase -DatabaseServer $SqlServer -DatabaseName $DatabaseName -AdminAddress localhost# Logging Database oluşturma
New-CtxDatabase -DatabaseServer $SqlServer -DatabaseName CitrixLoggingDB -LoggingDatabase# Monitoring Database oluşturma
New-CtxDatabase -DatabaseServer $SqlServer -DatabaseName CitrixMonitoringDB -MonitorDatabase
- Bir lisans sunucusu kurmak için;
# Lisans Sunucusu ISO dosyasını mount edin
$driveLetter = “D:”
cd $driveLetter# Citrix License Server Kurulumu
Start-Process -FilePath “$driveLetter\Licensing\LS\CitrixLicensing.exe” -ArgumentList “/quiet” -Wait
- Bu sunucunun çalışıp çalışmadığını kontrol etmek ve servisleri aktif etmek için;
# Lisans Sunucusu Servislerinin Kontrolü
Get-Service -Name “CitrixLicensing” -ErrorAction SilentlyContinue
Get-Service -Name “CitrixLicensingSupport” -ErrorAction SilentlyContinue
- Lisans sunucusu için Windows Güvenlik Duvarı ayarlarının yapılması gerekiyor, ben genelde bunu direkt kapatıyorum ama kullanan arkadaşlar aşağıdaki komutu çalıştırsın;
# Citrix Lisans Sunucusu için gerekli portları açma
New-NetFirewallRule -DisplayName “Citrix License Server 27000” -Direction Inbound -Protocol TCP -LocalPort 27000 -Action Allow
New-NetFirewallRule -DisplayName “Citrix License Management Console 8082” -Direction Inbound -Protocol TCP -LocalPort 8082 -Action Allow
- Lisans sunucusu yapılandırma için
# Değişkenler
$LicenseServerName = “lisansunucusuadresi.domain.com”
$LicenseModel = “XDT_ENT_CCS”# Lisans sunucusunu ayarlama
Set-BrokerSite -LicenseServerName $LicenseServerName -LicenseModel $LicenseModel
- Varsa bir lisansınız aşağıdaki şekilde girebilirsiniz yoksa zaten CVAD 28 günlük bir Trial lisansı otomatik olarak tanımlıyor
$LicenseFilePath = “C:\Lisanslar\my_license.lic”
Start-Process -FilePath “C:\Program Files\Citrix\Licensing\LS\lmadmin.exe” -ArgumentList “-import $LicenseFilePath” -Wait
- Lisans sunucusunun çalışıp çalışmadığını test etmek isterseniz;
# Lisans sunucusunun kontrol edilmesi
Test-BrokerSite -LicenseServerName $LicenseServerName
- Desktop Delivery Controller ve Lisans Sunucusu kurulumu bittiği için bir Site kurmamız gerekecektir;
# Site oluşturma
$SiteName = “CitrixSite”
$LicenseServer = “lisanssunucuFQDN”
$LicenseModel = “XDT_ENT_CCS”New-BrokerSite -SiteName $SiteName -DatabaseServer $SqlServer -DatabaseName $DatabaseName -LicenseServer $LicenseServer -LicenseModel $LicenseModel
- VDA için boş bir Windows 10 VM’e ihtiyacımız var, bunun üzerine CVAD .ISO ya da direkt Virtual Delivery Agent’ın .exe’sini indirip kurabilirsiniz;
# Değişkenler
$VDAInstallerPath = “C:\Path\To\VDAServerSetup.exe”
$DeliveryControllerAddress = “controller.domain.com”# VDA Kurulumu (Sessiz Mod)
Start-Process -FilePath $VDAInstallerPath -ArgumentList “/quiet /components VDA /enable_hdx_ports /optimize /controllers $DeliveryControllerAddress /noreboot” -Wait
- VDA kurulumu bittikten sonra makineye;
Restart-Computer -Force
- VM açıldıktan sonra test için;
# VDA Kayıt Durumunu Kontrol Etme
Get-BrokerMachine | Select-Object MachineName, RegistrationState
- CVAD üzerinde oluşturulacak makineler için bir Machine Catalog’a ihtiyacımız var. Aşağıdaki komut ile Single Session olacak şekilde bir Windows 10 işletim sistemine sahip Machine Catalog oluşturabiliyoruz. Provisioning method MCS ve makineler Static, o kısmı Random yaparsanız rastgele makine dağıtan bir catalog oluşturacaktır.
# Değişkenler
$CatalogName = “Win10CatalogSingleSession”
$CatalogDescription = “Windows 10 Single Session Catalog”
$VMTemplate = “Win10-Template” # Bu, kullandığınız VM Template’in adıdır.
$NumberOfVMs = 10 # Oluşturmak istediğiniz VM sayısı
$Domain = “yourdomain.com” # Domain adı# Machine Catalog oluşturma (Single Session)
New-BrokerCatalog -Name $CatalogName `
-AllocationType Static `
-ProvisioningType MCS `
-SessionSupport SingleSession `
-MachineType Desktop `
-Description $CatalogDescription# VMs Oluşturma ve Catalog’a Ekleme
$ADAccount = “Win10-VM$”
$OU = “OU=VDIs,DC=domain,DC=com” # Active Directory’deki OU yoluNew-ProvVM -CatalogName $CatalogName `
-TemplateVM $VMTemplate `
-NumberOfVMs $NumberOfVMs `
-ADAccountNamePattern $ADAccount `
-Domain $Domain `
-OU $OU
- Machine Catalog oluşturduk, sıra Delivery Group’da, yine yukarıdaki konfigürasyona uygun olarak bir Delivery Group için;
# Değişkenler
$DeliveryGroupName = “Win10GroupSingleSession”
$CatalogName = “Win10Catalog”
$DesktopGroupUsers = @(“Domain Users”)# Delivery Group oluşturma (SingleSession)
New-BrokerDesktopGroup -Name $DeliveryGroupName `
-DeliveryType DesktopsAndApps `
-CatalogName $CatalogName `
-SessionSupport SingleSession `
-AllowedUsers $DesktopGroupUsers
- Şimdi bu durumda bir Machine Catalog oluşturduk, ona erişecek Delivery Groupları da belirledik ama bu arkadaşlar hangi adresten nasıl gelecekler? Bunun için ikinci bir VM üzerine CVAD Storefront rolünü kuruyoruz;
# Değişkenler
$DeliveryGroupName = “Win10GroupSingleSession”
$CatalogName = “Win10Catalog”
$DesktopGroupUsers = @(“Domain Users”)# Delivery Group oluşturma (SingleSession)
New-BrokerDesktopGroup -Name $DeliveryGroupName `
-DeliveryType DesktopsAndApps `
-CatalogName $CatalogName `
-SessionSupport SingleSession `
-AllowedUsers $DesktopGroupUsers
- Son olarak yaptıklarımızı test etmek için Delivery Controller’ın yüklü olduğu VM’de şu komutu çalıştırın;
# Site test komutu
Test-BrokerSite -AdminAddress localhost
- DB bağlantısını test etmek için;
Get-BrokerDBConnection
Test-BrokerDBConnection
- Delivery Group test için;
Get-BrokerDesktopGroup
Test-BrokerAccessPolicyRule
- Storefront sunucusunun testi için;
Test-STFConfiguration
Tüm bu adımları tamamladıktan sonra basit bir CVAD kurulumu yapmış, bunun üzerinde bir Windows 10 VM’i dağıtarak Machine Catalog oluşturmuş oluyoruz ve Storefront arayüzünden buna erişebiliyor olmamız gerek. Citrix’in https://developer-docs.citrix.com/en-us/citrix-virtual-apps-desktops-sdk/ adresinden detaylı bilgilere ulaşabilir, kendi scriptinizi hazırlayabilirsiniz.
Fırsat bulursam Production seviyesinde bir CVAD ortamının kurulumu için birkaç PowerShell scripti hazırlayacağım, tamamladığımda buradan yine sizlerle paylaşacağım. Orada biraz optimizasyon, profil yönetimi vb. gelişmiş yapılandırma konularına da girmeyi düşünüyorum.
Sorunuz olursa bana yazmaktan çekinmeyin.
Teşekkürler.


